Thanatos: Installation and Usage
This is part two of a series of blog posts on Thanatos, a Mythic C2 agent written in Rust. This post will go over setting up Mythic and Thanatos in an Ubuntu VM and the agent’s usage.
Part one of the series discusses how this project came about and the development of it.
Project repository: https://github.com/MythicAgents/thanatos
Overview
- Thanatos Features and Functionality
- Installing Mythic with Thanatos: Setting up Mythic and Thanatos on an Ubuntu VM
- Building the Agent: How to build the payload
- Using the Agent: Basic functionality
- Unique Capabilities: Features which standout compared to other C2 agents
- Future Improvements
Thanatos Features and Functionality
If you’re new to Mythic, I highly recommend checking out the Mythic Documentation. Mythic is very unique compared to other C2 frameworks due to its modular design. Other frameworks such as Cobalt Strike or Empire include a full suite of modules including: C2 profiles/transports, stagers, payloads a UI, etc. Mythic decides to take these common features of a C2 framework and split them up into three distinct server, C2 profiles and payload types modules. Due to this design, payloads can vary from compiled .NET Windows executables to chrome web browser extensions. C2 profiles give the operator and developers flexibility on how their payloads communicate with Mythic. This allows a very high level of flexibility to tune the operation based on what the target is. The currently public C2 profiles are HTTP, DNS and websocket but profiles can be developed which utilize AWS S3 buckets, Microsoft Teams, Dropbox or various other mediums for communication.
It’s important to note this modular aspect when using Mythic since it provides a somewhat unique experience when performing red team operations.
Installing Mythic with Thanatos
Setting up a machine with Mythic and installing Thanatos is very straight forward thanks to
Mythic’s use of Docker containers. Along the that, there is a convenient mythic-cli program which
can be used instead of manually setting up and running all of the images.
The first thing to do is setup Linux machine and install docker. For this example I will be using Ubuntu 20.04 in a virtual machine.
Be sure you allocate enough resources to your machine. I will be using a virtual machine with 20GB of hard drive space, 8GB of ram and 2 vCPUs.
After Linux is setup, docker and docker-compose need to be installed.
sudo apt update
sudo apt install docker.io docker-compose
Ensure the docker daemon has been started and set to start on boot
sudo systemctl enable --now docker
Next, clone the Mythic repository from Github. This can be cloned to anywhere on the machine.
git clone https://github.com/its-a-feature/Mythic.git --depth 1
The --depth 1 is optional but it makes the download significantly faster.
ubuntu@mythic-server:~$ git clone https://github.com/its-a-feature/Mythic.git --depth 1
Cloning into 'Mythic'...
remote: Enumerating objects: 2245, done.
remote: Counting objects: 100% (2245/2245), done.
remote: Compressing objects: 100% (1983/1983), done.
remote: Total 2245 (delta 276), reused 2112 (delta 231), pack-reused 0
Receiving objects: 100% (2245/2245), 24.81 MiB | 17.27 MiB/s, done.
Resolving deltas: 100% (276/276), done.
ubuntu@mythic-server:~$ cd Mythic/
ubuntu@mythic-server:~/Mythic$ ls
C2_Profiles           Example_Payload_Type      install_docker_kali.sh    mythic-docker        postgres-docker  SECURITY.md
docker-compose.yml    Example_Translator        install_docker_ubuntu.sh  mythic-react-docker  rabbitmq-docker  VERSION
documentation-docker  hasura-docker             LICENSE                   nginx-docker         README.md
Example_C2_Profile    install_docker_debian.sh  mythic-cli                Payload_Types        redis-docker
ubuntu@mythic-server:~/Mythic$
The newly cloned Mythic repo contains a mythic-cli program. This program is used for
managing the framework.
Configuring the server is done through a .env file located in the Mythic directory. To
generate this configuration file run ./mythic-cli config
ubuntu@mythic-server:~/Mythic$ ./mythic-cli config
ALLOWED_IP_BLOCKS = 0.0.0.0/0
COMPOSE_PROJECT_NAME = mythic
DEFAULT_OPERATION_NAME = Operation Chimera
DOCUMENTATION_BIND_LOCALHOST_ONLY = true
DOCUMENTATION_HOST = mythic_documentation
DOCUMENTATION_PORT = 8090
EXCLUDED_C2_PROFILES =
EXCLUDED_PAYLOAD_TYPES =
HASURA_BIND_LOCALHOST_ONLY = true
HASURA_HOST = mythic_graphql
HASURA_PORT = 8080
HASURA_SECRET = bWeMjZIlXjbl54NWlW0GoHv2FJOnhH
JWT_SECRET = ZxkLIpPB5HbH8LNU3kvTpkxS6epnPU
MYTHIC_ADMIN_PASSWORD = 2Kszg9c5fRUDapU1TF9UxNzpfn16HA
MYTHIC_ADMIN_USER = mythic_admin
MYTHIC_DEBUG = false
MYTHIC_ENVIRONMENT = production
MYTHIC_REACT_BIND_LOCALHOST_ONLY = true
MYTHIC_REACT_HOST = mythic_react
MYTHIC_REACT_PORT = 3000
MYTHIC_SERVER_BIND_LOCALHOST_ONLY = true
MYTHIC_SERVER_DYNAMIC_PORTS = 7000-7010
MYTHIC_SERVER_HOST = mythic_server
MYTHIC_SERVER_PORT = 17443
NGINX_BIND_LOCALHOST_ONLY = false
NGINX_HOST = mythic_nginx
NGINX_PORT = 7443
NGINX_USE_SSL = true
POSTGRES_BIND_LOCALHOST_ONLY = true
POSTGRES_DB = mythic_db
POSTGRES_HOST = mythic_postgres
POSTGRES_PASSWORD = zhqoomxZd3BsI1x5tcAnLTosiJjBRG
POSTGRES_PORT = 5432
POSTGRES_USER = mythic_user
RABBITMQ_BIND_LOCALHOST_ONLY = true
RABBITMQ_HOST = mythic_rabbitmq
RABBITMQ_PASSWORD = bIoU2A9M5vZTZ8LopdYpik2pktMDiJ
RABBITMQ_PORT = 5672
RABBITMQ_USER = mythic_user
RABBITMQ_VHOST = mythic_vhost
REBUILD_ON_START = true
REDIS_BIND_LOCALHOST_ONLY = true
REDIS_HOST = mythic_redis
REDIS_PORT = 6379
SERVER_HEADER = nginx 1.2
SIEM_LOG_NAME =
WEB_KEEP_LOGS = false
WEB_LOG_SIZE = 1024000
ubuntu@mythic-server:~/Mythic$
The defaults can be kept the same; however, I am going to set a different admin password.
MYTHIC_ADMIN_PASSWORD="TestingPassword123!@#"
Since this is a test VM for a demo only reachable from my host machine, I am okay with using the default Mythic admin user and an insecure password.
After that’s done, it’s time to install the Thanatos payload and HTTP C2 profile.
sudo ./mythic-cli install github https://github.com/MythicAgents/thanatos
sudo ./mythic-cli install github https://github.com/MythicC2Profiles/http
Mythic can now be started
sudo ./mythic-cli mythic start
This can take a fair bit of time depending on your network connection. Mythic has to download all of the docker images for the server along with the docker images for the HTTP profile and Thanatos.
real    3m4.578s
user    0m2.149s
sys     0m0.422s
If everything went well, Mythic should be reachable at https://<IP address>:7443/ using
a web browser.
To make sure everything was set up correctly, log in using the password you set. The
username is mythic_admin unless you changed it during the configuration. Navigate to the
C2 Profiles and Paylod Types page by clicking on the headphones icon in the top left
corner.
Thanatos should be listed under the Payload Types and http under the C2 Profiles with a green status icon.

Note: “tetanus” was the old name for the Mythic agent. This is why the payload types entry has an agent named tetanus instead of thanatos.
Building the Agent
The build page can be reached by clicking on the Payloads icon on the top left of the
web page next to the C2 Profiles and Payload Types icon. In the drop down Actions
menu in the top left, click the Generate New Payload button.
This menu will prompt you to select the target OS. Thanatos only supports targeting Windows or Linux. After the target OS is selected, the build parameters configuration will be available.
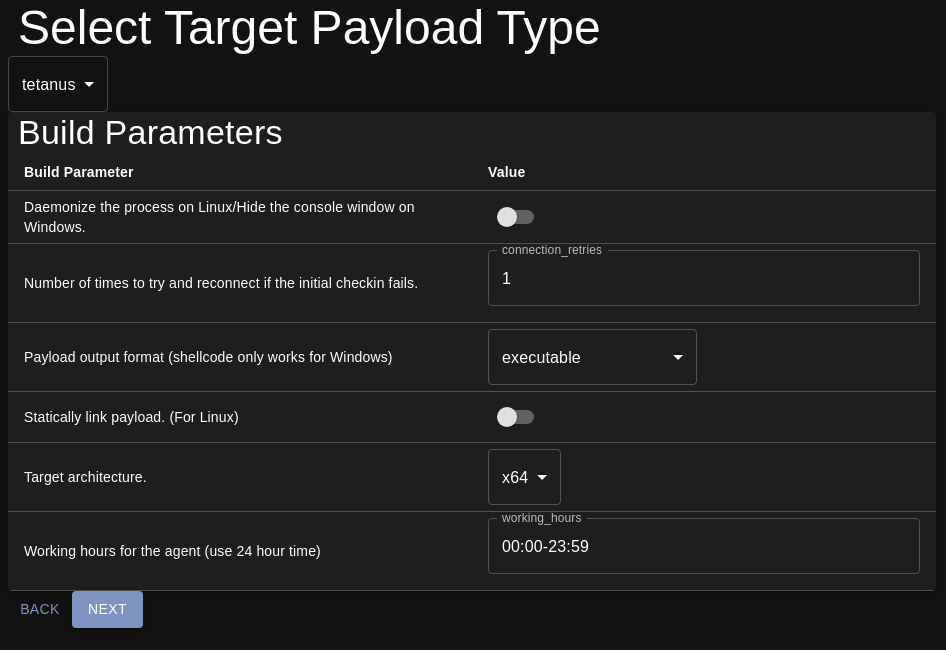
The first build parameter is an option to configure how the agent should run. If this options is set and the payload is built for Windows, the agent will hide the console window when it is executed. For Linux, this option controls whether the agent should run in the foreground or fork and run in the background.
The second build parameter controls how many attempts the agent should make for the initial check in. If the agent fails to establish a connection when it is executed, it will sleep for the configured interval and try to establish another connection. The retries determine how many attempts the agent should make before it will stop. More information about it can be found in the Mythic documentation.
The third parameter configures the output format for the payload file. Thanatos can be built as a standalone executable, a shared library, or raw shellcode for Windows. The shared library option will build a Windows DLL when targeting Windows and an ELF shared object when targeting Linux. The raw shellcode for Windows can be used for injecting the payload through various injection techniques or for developing obfuscation wrappers. Picking the shellcode option when targeting Linux will result in the build failing!
The fourth parameter controls static linking for Linux payloads. Statically linking the payload will make the executable size larger; however, it will help ensure it can run on all Linux platforms. This is recommended if trying to spawn the agent on a host using a non glibc libc or on older Linux systems. This option has no effect when building payloads for Windows.
The fifth parameter is the payload architecture. The payload can be built to target both 32 and 64 bit x86 systems.
The sixth parameter is the working hours. The working hours mean that the agent will only make connections to Mythic during the configured time frame. This also includes the initial check in. If the agent was executed when not in the configured working hours period, it will not check in until the start of the working hours the next day. This option can be changed during operation of the agent using the
workinghourscommand. The format for the working hours isHH:MM-HH:MMusing 24 hour format. When operating, the agent will use the targeted system’s locally set time zone. Time zone calculations may be needed in order to compensate for time differences.
After the build parameters are set, the next menu will allow you to configure what commands to build into the agent. The agent does not support dynamic compilation of features so all commands are included.
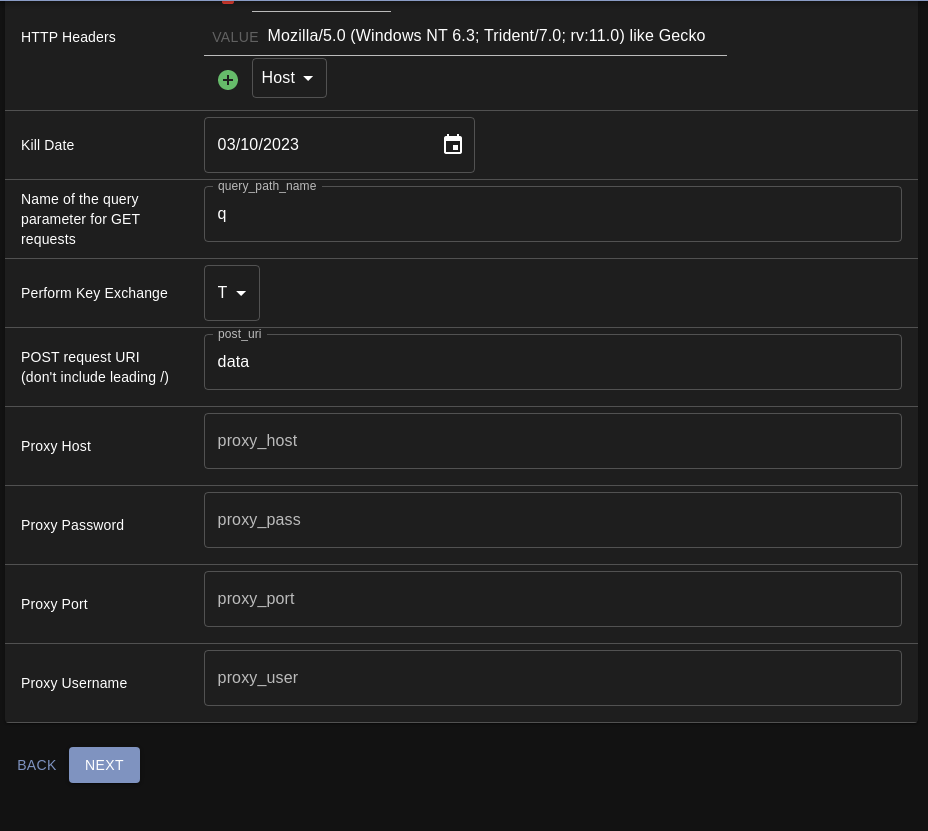
The C2 profiles page only gives an option for HTTP. There are plans to include different C2 profiles in the future.
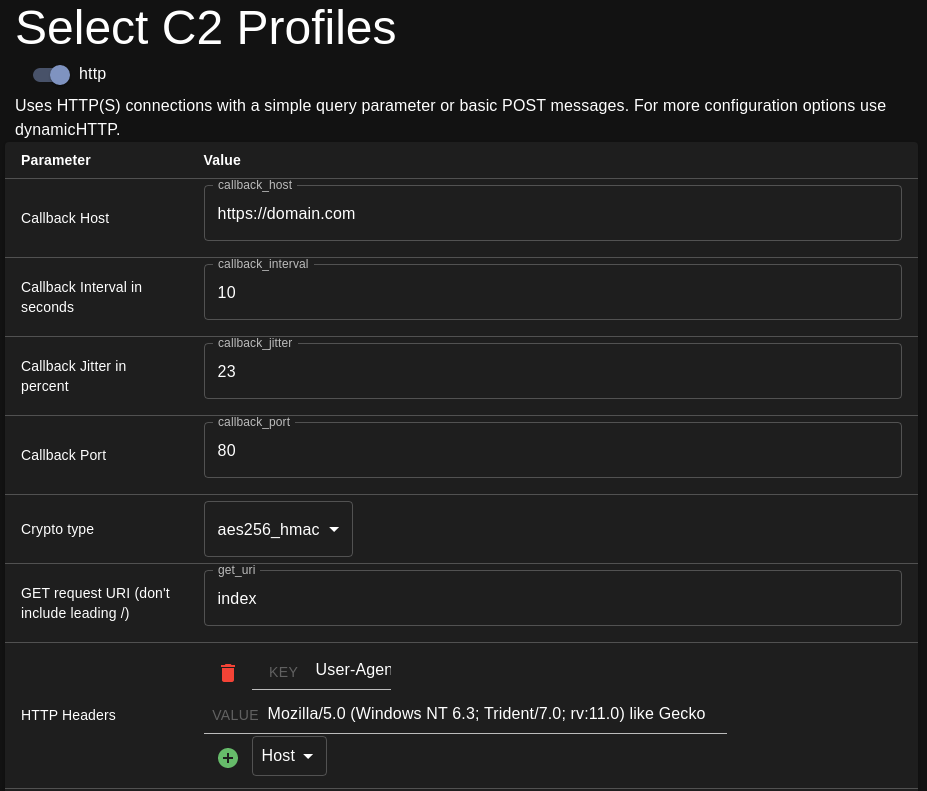
Callback Host
- Hostname or IP to connect to when beaconing back to Mythic.
Callback Interval in seconds
- Sleep interval for the agent in seconds. This can be changed while interacting with
the agent using the
sleepcommand.
- Sleep interval for the agent in seconds. This can be changed while interacting with
the agent using the
Callback Jitter in percent
- Jitter to apply for the agent’s sleep interval. The agent will pick a random
percentage value between 0 and the configured jitter during each sleep time. The
jitter is randomly added or subtracted from the configured sleep interval during the
sleep time. If the sleep interval is set for 30 seconds and the jitter value is 50%,
the agent will choose a random sleep time between 15 to 45 seconds. This value can be
changed during operation using the
sleepcommand.
- Jitter to apply for the agent’s sleep interval. The agent will pick a random
percentage value between 0 and the configured jitter during each sleep time. The
jitter is randomly added or subtracted from the configured sleep interval during the
sleep time. If the sleep interval is set for 30 seconds and the jitter value is 50%,
the agent will choose a random sleep time between 15 to 45 seconds. This value can be
changed during operation using the
Callback Port
- Listening port of the server for http requests.
Crypto type
- Choose whether the C2 traffic should be AES256 encrypted or if there should be no encryption.
GET request URI
- The URI for performing GET requests.
HTTP Headers
- Addition HTTP headers for the agent.
Kill Date
- Kill date of the agent
Query Path Name
- Name of the query parameter for GET requests
Perform Key Exchange
- Configure whether or not the agent should perform a key exchange during the initial check in.
Proxy Information
- Connecting to socks proxies from the agent to Mythic is currently unimplemented so these proxy parameters can be left blank
Once the C2 profile information is set, the next page will allow you to name the payload along with setting a description for it. The description for the payload will be the initial description in the C2 callbacks page.
Once the payload creation has kicked off, it can take around 15 seconds to a few minutes for the agent to build depending on VM resources. Thanatos will do dependency caching after the initial build depending on target OS, architecture and static linking. For example, an initial x64 Windows agent build will take the pre-built dependencies and cache them. Future builds targeting Windows x64 will take significantly less time as compared to the initial build because the dependencies from the initial build are used.
The payload builder works this way to keep the initial size of the docker image smaller while also shortening consecutive build times. Not every operation is going to need the pre-build dependencies targeting 32 bit Linux; therefore, those pre-built dependencies are not going to take up unnecessary disk space.
Using the Agent
The basic agent operations are very similar to any other Mythic payload. Thanatos has a few features which are slightly different than other Mythic payloads.
During initial check in for Linux hosts, Thanatos will query information about the Linux kernel version and whether or not the agent is on an SELinux system. That information can be found by clicking on the Linux icon under the OS section in the callback page.
![]()

Here is an example of what it will show. The kernel version of the system this payload is
running on is 5.16.12-200.fc35.x86_64 and it does have SELinux capabilities.
The interact row can be used to interact with the agent. The dropdown menu provides various quick interactions. Clicking on the keyboard icon will pull up the command window at the bottom of the screen.
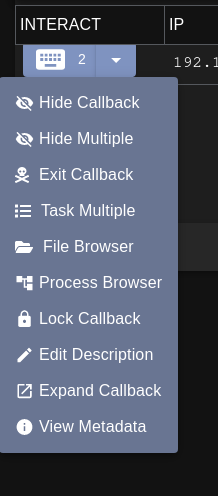

Issuing help in the command window will show a list of all the available commands and a
brief description about them. More information about the available commands can be found
in the Mythic documentation.
The Mythic documentation can be reached by clicking on the question mark in the top right
corner and clicking on Agent Documentation. This page is where Mythic will store the
documentation about payload types and C2 profiles. The left side of the web page will have
a list of all the installed agents. Clicking on Thanatos will pull up the documentation for
the Thanatos payload. Clicking on the Commands menu on the left side of the web page will
bring up a list of all the commands Thanatos supports. Clicking on the command will take
you to that command’s documentation.
Issuing tasking can be done using the Mythic popup UI or through named parameter flags.
The Mythic popup UI can be displayed by typing the command in the task Window and pressing
Shift + Enter. Commands and their parameters can also be issued directly through the
tasking prompt using named parameters or inline with the command.
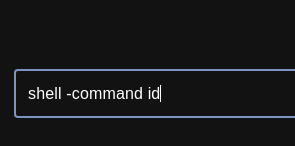
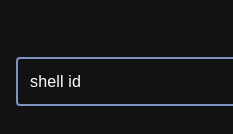
Not every command supports entering arguments directly in the task prompt. Every command
does support the Mythic UI popup by pressing Shift + Enter after typing the command in
the tasking prompt. For more information about command parameter formats, refer to the documentation for the
command in the Mythic documentation.
Some commands support browser scripts. Browser scripts in Mythic allow more refined ways of formatting the task output along with potentially issuing other tasking through the browser script.
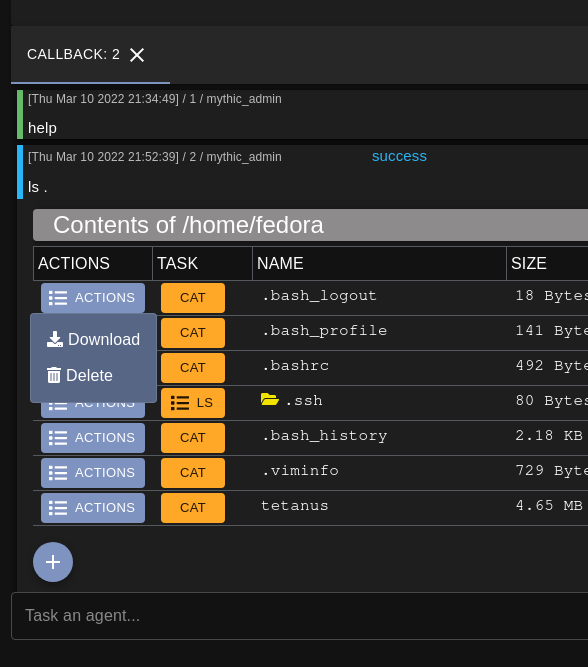
In the ls example, the browser script allows for new tasking to be issued by clicking on
any of the tasking buttons. More browser script support is planned for the future since it
makes issuing more tasks very convenient.
Unique Capabilities
Thanatos features a few capabilities which other agents do not have. Starting with building the agent, Thanatos allows the operator a lot of flexibility on choosing how to build the agent. This flexibility includes controlling the output format, target architecture, static linking and even whether or not the agent should daemonize. The operator can also choose configuration for the C2 communications such as how many times the agent should attempt to check in if the initial check in fails and what time throughout the day the agent should make check ins to the C2.
Going into the operation of the agent, Thanatos currently has two distinct features that
are somewhat unique. The first being its SSH capabilities. The agent uses the
ssh2 library in order to make SSH connections. The
agent features a whole suite of commands which can all be executed over SSH. These include
executing shell commands, downloading and uploading files between the SSH connected
machine and Mythic, displaying the contents of files, grabbing directory listings and
removing files. Typing ssh into the tasking prompt for a callback and pressing Shift + Enter will display the capabilities and parameters.
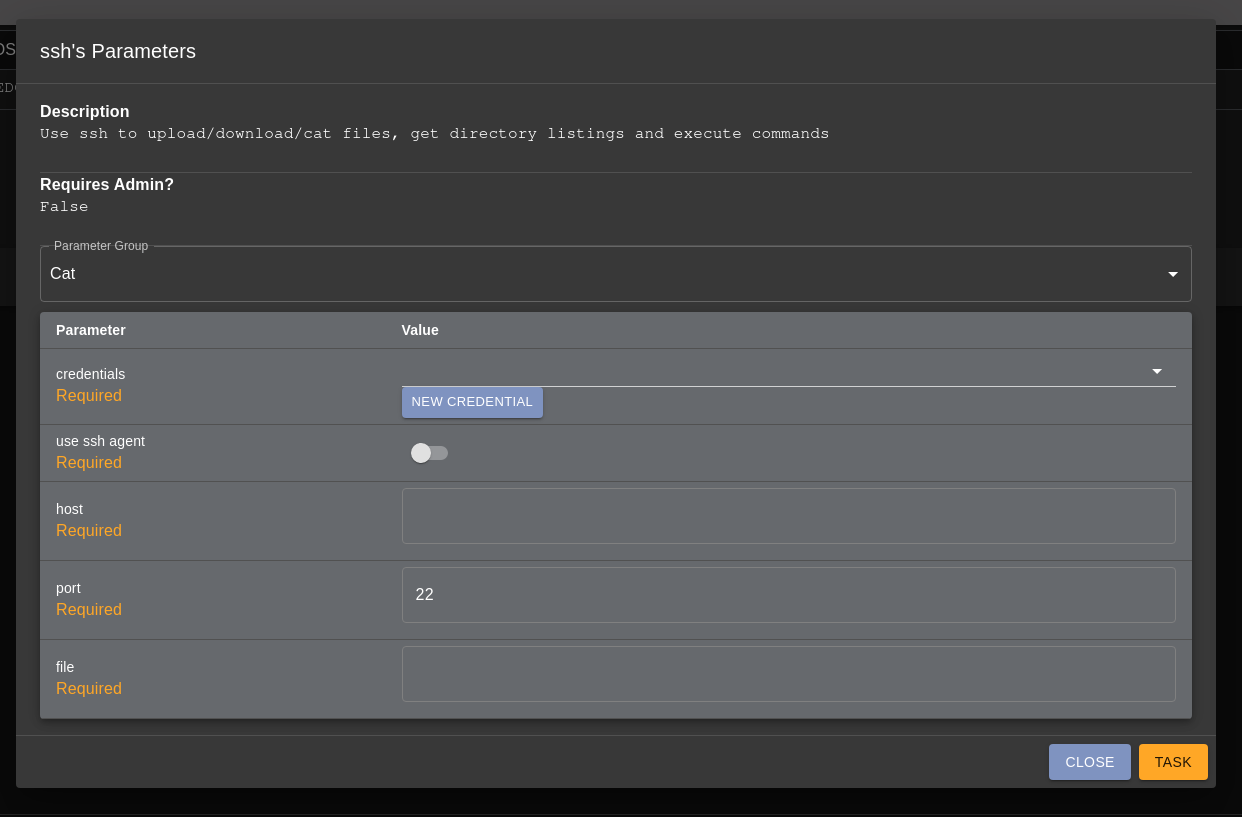
The dropdown menu for the parameter group can be selected to choose what action you would like to perform over ssh.
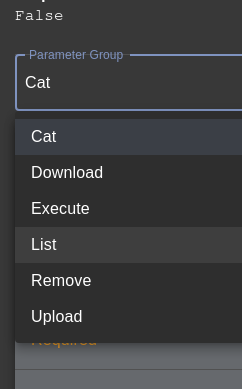
All of the actions are documented in the Mythic documentation but I would like to
highlight the List action.
The first parameter for each ssh function is to select what credentials to use. The agent
will pull these credentials from the Mythic credential database. When creating a new
credential for ssh, the plaintext credential type means that the supplied credential is
a plain text username and password combination. A credential type of key signifies that
the supplied credential is an SSH private key. The only options in the Mythic credential
which need to be populated are the Account Name for the username of the account to log in
as for SSH and the Credential which is either the plain text password for the user or an
SSH private key.
Once the credential is selected, the use ssh agent option can be set to false. This tells
Thanatos whether it should use running ssh agents on the system for authentication instead
of through the Mythic credential. More information about that can be found in the
documentation for the ssh-agent command.
I have another Linux machine located at 192.168.122.56 where I know the username and
password for a user on that machine.
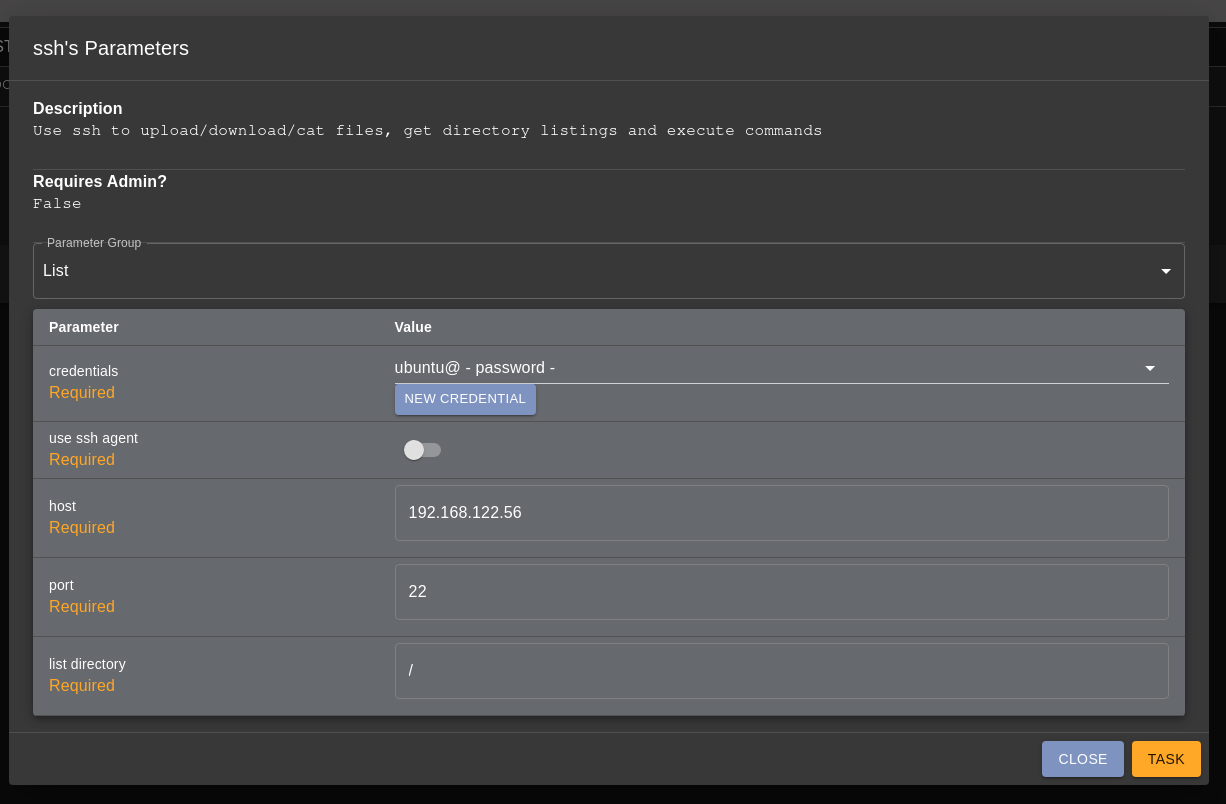
Once I submit the task, the agent will attempt to connect to that machine through SSH with the ubuntu user and grab a directory listing of the root directory.
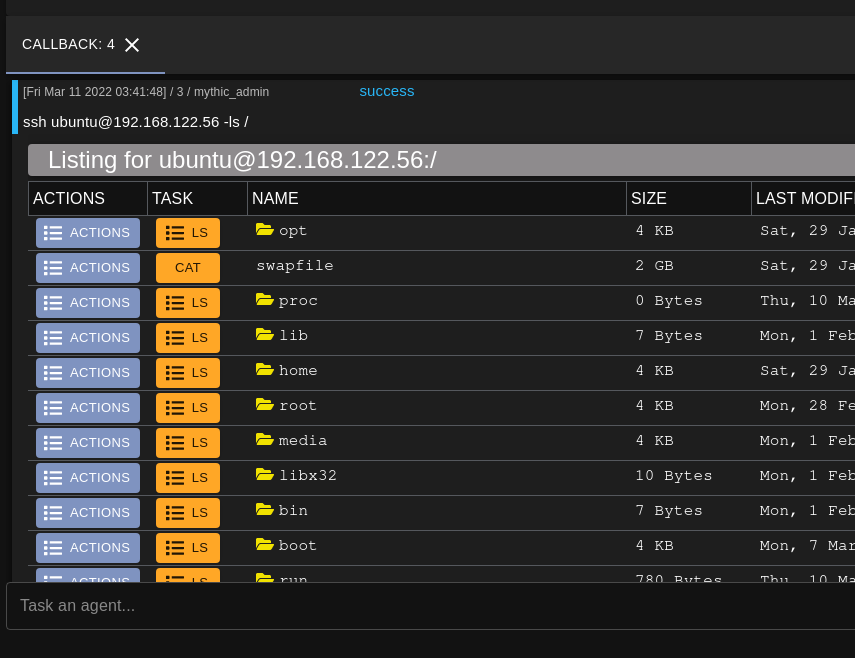
The SSH command features a browser script which will pull the time metadata and permissions
for each entry similar to the regular ls browser script. Along with that, the browser
script features the same context menus as the normal ls command. Through the browser
script, the operator can issue new SSH tasking to list different subdirectories or perform
other actions.
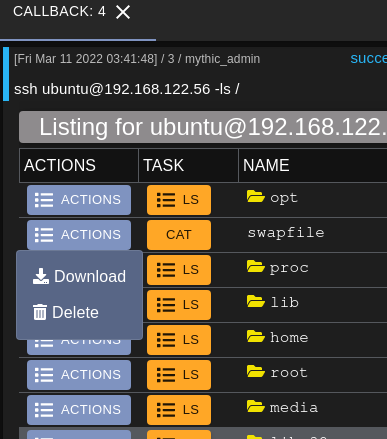
Tasking issued through the browser script will use the same credentials and host information for the new task so the new task will be queued automatically without having to manually fill out the task parameters.
This provides a very convenient way to interact with other machines through SSH without having to spawn a payload on the machine.
The second notable feature is the ability to stand up TCP redirectors through the redirect command.
The agent will listen for connections on a machine and relay them to another machine. This
is very useful when dealing with machines that do not have direct Internet access. A
redirector can be created which will redirect traffic from the machine to a server on the
Internet.
The redirect capability can also bring p2p-like functionality to other agents which do not
support peer-to-peer connections. The Mythic documentation for the redirect command gives
an example of using the redirector to tunnel C2 traffic through the agent. This idea can
also be translated to other tools and C2 agents. Empire and meterpreter can be tunneled
through Thanatos to give it p2p functionality.
Since setting up redirectors requires binding to a port on the machine, it is not very OPSEC safe and may not be practical in restricted environments. This functionality was designed for lab environments which require a lot of pivoting and lateral movement. I have found when going through various red team labs that there are machines which cannot directly connect to my machine. This can make pivoting a little cumbersome by having to use something like chisel or SSH port forwarding in order to gain access to that machine. Having a tool which contains port forwarding capabilities built in (and eventually socks proxying) makes it more convenient when trying to pivot to other machines since I do not have to upload chisel binaries or rely on the pivot machine having SSH available.
Future Improvements
Future development plans and agent features are mentioned in part one of the blog post series.